
What is Kubernetes?
I am sure we’ve all heard of Kubernetes by now, but if not, here’s a quick refresher. Kubernetes (or K8s) is a powerful open-source container orchestration tool across a cluster of machines, initially developed by Google. This is a REALLY brief summary, and there is a whole lot more information on Kubernetes at the official site which can be overwhelming. I am huge proponent of learning through practice, so without further ado, let’s jump into it.
Note: I will be using the short form of “k8s” to refer to Kubernetes throughout this post
We are going to follow the example of deploying WordPress and MySQL with Persistent Volumes to cover some important components of a k8s cluster.
Set up a local cluster
We are going to use minikube to run a local Kubernetes system. As per the documentation, we need some kind of container manager, and in my case I am using Docker.
Here is a rough outline to set up our cluster
- Install minikube
- Create a minikube cluster
- Use
kubectlto interact with the cluster
We will use the kubectl command to interact with our cluster:
Verify our cluster is running:
-- start minikube
minikube start
-- check status of cluster
kubectl version
kubectl get service
kubectl get all
There should only be a single default service running:
PS C:\Users\PAREKH-TEST\kube101> kubectl get all
NAME                 TYPE        CLUSTER-IP   EXTERNAL-IP   PORT(S)   AGE
service/kubernetes   ClusterIP   10.96.0.1    <none>        443/TCP   16d
Create PersistentVolumeClaims and PersistentVolumes
A PersistentVolume (PV) is a piece of storage in the cluster that has been manually provisioned by an administrator, or dynamically provisioned by Kubernetes using a StorageClass. A PersistentVolumeClaim (PVC) is a request for storage by a user that can be fulfilled by a PV. PersistentVolumes and PersistentVolumeClaims are independent from Pod lifecycles and preserve data through restarting, rescheduling, and even deleting Pods. A StorageClass (SC) is a dynamically provisioned storage resource that along with PVs, uses a Container Storage Interface (CSI) to interact with the storage (e.g. local storage, or Cloud Storage).
Think of a PVC as a ticket to use the resources specified in a PV or Storage Class. When defining a PVC, if neither a PV nor StorageClass is specified, a PersistentVolume is dynamically provisioned based on the default StorageClass configuration.
NOTE: In local clusters, the default StorageClass uses the hostPath provisioner. hostPath volumes are only suitable for development and testing. With hostPath volumes, your data lives in /tmp on the node the Pod is scheduled onto and does not move between nodes. If a Pod dies and gets scheduled to another node in the cluster, or the node is rebooted, the data is lost.
Both MySQL and WordPress require a PV to store data and their PVs will be created at the deployment step.
Create Secrets
MySQL requires a secure login to access the data stored on the database. In order for our application (WordPress) to be able to authenticate, we create a separate object called a Secret. A Secret is an object that stores a piece of sensitive data like a password or key, and using a Secret means you don’t have to include confidential data in your application code.
Secrets are similar to ConfigMaps but are specifically intended to hold confidential data.
Caution: Kubernetes Secrets are, by default, stored unencrypted in the API server’s underlying data store (etcd). Anyone with API access can retrieve or modify a Secret, and so can anyone with access to etcd. Additionally, anyone who is authorized to create a Pod in a namespace can use that access to read any Secret in that namespace; this includes indirect access such as the ability to create a Deployment.
We could declare a Secret using the command line:
1
2
kubectl create secret generic empty-secret
kubectl get secret empty-secret
Or create a configuration file e.g:
Example configuration to declare a Secret
apiVersion: v1
kind: Secret
metadata:
  name: examplesecret
  annotations:
    kubernetes.io/service-account.name: "examplesecret"
type: Opaque
data:
  # You can include additional key value pairs as you do with Opaque Secrets
  username: username
  password: examplepasswd
Create a kustomization YAML
However, since 1.14, kubectl supports the management of Kubernetes objects using a kustomization file. You can generate resources such as a ConfigMap, or even a Secret, which we will utilize as follows, taking care to change the password to your liking:
Add a Secret generator in kustomization file
cat <<EOF >./kustomization.yaml
secretGenerator:
- name: mysql-pass
  literals:
  - password=Test123
EOF
This will generate the Secret and it will be used to set the database password in the MySQL deployment. The generated Secret can be examined with the following:
kubectl kustomize ./
Obtain the Deployment Files
What we have done so far is just start the virtual empty cluster in minikube. To run our applications in the cluster, we will declare our desired system state using YAML files. These YAML files act as a manifest to describe how the particular resource should be configured. There is a more time consuming and tedious method of manually creating the components of our cluster, but using a YAML file incorporates everything we need.
For this example, there are 2 configuration/manifest files provided. Within each manifest file, each component is identified with the lines:
1
2
3
apiVersion: [VERSION_NUMBER]
kind: [COMPONENT_KIND]
....
The name/identification of the component would then be under the metadata field as “name”. Additionally, you can set a label to group all the resources
1
2
3
4
5
6
....
metadata:
  name: [NAME_OF_COMPONENT]
  labels:
    app: [LABEL_TO_IDENTIFY]
....
The rest of the section would be to specify the configuration details, hence it would be under “spec” e.g:
1
2
3
4
5
6
7
8
9
.....
spec:
  ports:
    - port: 3306
  selector:
    app: wordpress
    tier: mysql
  clusterIP: None
....
1. mysql-deployment.yaml
Let’s take a look at the MySQL manifest file:
1
2
3
4
5
6
7
8
9
10
11
12
13
14
15
16
17
18
19
20
21
22
23
24
25
26
27
28
29
30
31
32
33
34
35
36
37
38
39
40
41
42
43
44
45
46
47
48
49
50
51
52
53
54
55
56
57
58
59
60
61
62
63
64
65
apiVersion: v1
kind: Service
metadata:
  name: wordpress-mysql
  labels:
    app: wordpress
spec:
  ports:
    - port: 3306
  selector:
    app: wordpress
    tier: mysql
  clusterIP: None
---
apiVersion: v1
kind: PersistentVolumeClaim
metadata:
  name: mysql-pv-claim
  labels:
    app: wordpress
spec:
  accessModes:
    - ReadWriteOnce
  resources:
    requests:
      storage: 20Gi
---
apiVersion: apps/v1
kind: Deployment
metadata:
  name: wordpress-mysql
  labels:
    app: wordpress
spec:
  selector:
    matchLabels:
      app: wordpress
      tier: mysql
  strategy:
    type: Recreate
  template:
    metadata:
      labels:
        app: wordpress
        tier: mysql
    spec:
      containers:
      - image: mysql:5.6
        name: mysql
        env:
        - name: MYSQL_ROOT_PASSWORD
          valueFrom:
            secretKeyRef:
              name: mysql-pass
              key: password
        ports:
        - containerPort: 3306
          name: mysql
        volumeMounts:
        - name: mysql-persistent-storage
          mountPath: /var/lib/mysql
      volumes:
      - name: mysql-persistent-storage
        persistentVolumeClaim:
          claimName: mysql-pv-claim
There are 3 components here:
- Service
- This is an abstract layer that runs as a network Service
- Allows communication to a set of Pods identified in the “selector” section
- For our example, we are specifying port 3306
- PersistentVolumeClaim (PVC)
- This is a request for storage, similar to a Pod
- Pods consume node resources, while PVCs consume Persistent Volume resources
- In our case, we are requesting 1GB to mount at /var/lib/mysql
- Deployment
- This provides declarative updates for Pods and ReplicaSets
- In our case, we are describing an end state of a single MySQL instance
- We are also using the MYSQL_ROOT_PASSWORD environment variable that will be obtained from the Secret
2. wordpress-deployment.yaml
The following manifest describes a single-instance WordPress Deployment. The WordPress container mounts the PersistentVolume at /var/www/html for website data files. The WORDPRESS_DB_HOST environment variable sets the name of the MySQL Service defined above, and WordPress will access the database by Service. The WORDPRESS_DB_PASSWORD environment variable sets the database password from the Secret kustomize generated.
1
2
3
4
5
6
7
8
9
10
11
12
13
14
15
16
17
18
19
20
21
22
23
24
25
26
27
28
29
30
31
32
33
34
35
36
37
38
39
40
41
42
43
44
45
46
47
48
49
50
51
52
53
54
55
56
57
58
59
60
61
62
63
64
65
66
67
apiVersion: v1
kind: Service
metadata:
  name: wordpress
  labels:
    app: wordpress
spec:
  ports:
    - port: 80
  selector:
    app: wordpress
    tier: frontend
  type: LoadBalancer
---
apiVersion: v1
kind: PersistentVolumeClaim
metadata:
  name: wp-pv-claim
  labels:
    app: wordpress
spec:
  accessModes:
    - ReadWriteOnce
  resources:
    requests:
      storage: 20Gi
---
apiVersion: apps/v1
kind: Deployment
metadata:
  name: wordpress
  labels:
    app: wordpress
spec:
  selector:
    matchLabels:
      app: wordpress
      tier: frontend
  strategy:
    type: Recreate
  template:
    metadata:
      labels:
        app: wordpress
        tier: frontend
    spec:
      containers:
      - image: wordpress:4.8-apache
        name: wordpress
        env:
        - name: WORDPRESS_DB_HOST
          value: wordpress-mysql
        - name: WORDPRESS_DB_PASSWORD
          valueFrom:
            secretKeyRef:
              name: mysql-pass
              key: password
        ports:
        - containerPort: 80
          name: wordpress
        volumeMounts:
        - name: wordpress-persistent-storage
          mountPath: /var/www/html
      volumes:
      - name: wordpress-persistent-storage
        persistentVolumeClaim:
          claimName: wp-pv-claim
We can download and add these files to our kustomization.yaml file.
Apply the kustomization file
-- Download the Files

curl -LO https://k8s.io/examples/application/wordpress/mysql-deployment.yaml
curl -LO https://k8s.io/examples/application/wordpress/wordpress-deployment.yaml

-- Add to kustomization.yaml

cat <<EOF >>./kustomization.yaml
resources:
  - mysql-deployment.yaml
  - wordpress-deployment.yaml
EOF
This will automatically group all the related components and update references to generated objects (.e.g. a Secret). To verify and view the kustomization.yaml file:
kubectl kustomize ./
Apply configuration to the cluster
We now have all the configuration files necessary to apply to our kluster:
1
kubectl apply -k ./
PS C:\Users\Kishan.TEST\Documents\GitHub\kube101> kubectl apply -k ./
secret/mysql-pass-2fk42k9f5m created
service/wordpress created
service/wordpress-mysql created
persistentvolumeclaim/mysql-pv-claim created
persistentvolumeclaim/wp-pv-claim created
deployment.apps/wordpress created
deployment.apps/wordpress-mysql created
Once applied, we can run our verifications
Verify all objects exist
-- Verify Secrets
kubectl get secrets
NAME TYPE DATA AGE
default-token-5rq8z kubernetes.io/service-account-token 3 19d
mysql-pass-2fk42k9f5m Opaque 1 11s
-- Verify PVC was created
kubectl get pvc
NAME STATUS VOLUME CAPACITY ACCESS MODES STORAGECLASS AGE
mysql-pv-claim Bound pvc-6e563550-27ab-44f9-9647-d8abd125bdef 1Gi RWO standard 21s
wp-pv-claim Bound pvc-e078a695-b166-45ae-b072-fdebd1cbf0cd 1Gi RWO standard 21s
-- Verify pods are running
kubectl get pods
NAME READY STATUS RESTARTS AGE
wordpress-6d84595b5d-7vlrm 1/1 Running 0 28s
wordpress-mysql-7d4d7594dd-p8nz9 0/1 ContainerCreating 0 28s
-- Verify services are running
kubectl get services wordpress
NAME TYPE CLUSTER-IP EXTERNAL-IP PORT(S) AGE
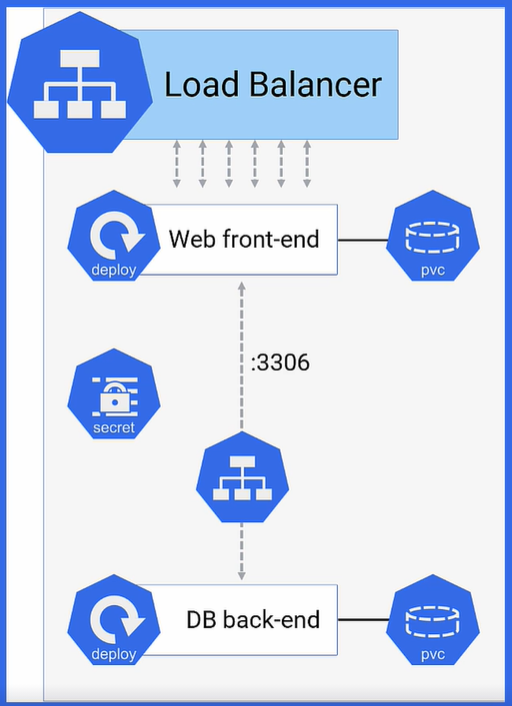
wordpress LoadBalancer 10.105.122.155 <pending> 80:30186/TCP 39sAn overview of what the application structure will look like is shown below:
Test Application
Run the following command to get the IP Address for the WordPress Service:
minikube service wordpress --url
Once the IP is obtained, copy the IP address and load the page in a browser to view your site:
Cleanup
Run the following to delete the entire Application (Services, Secret, Deployments)
kubectl delete -k ./
Further reading
- To read up more on using PersisentVolumes, please visit this link for more information.
- Other examples to run a MySQL instance in k8s